
Feel the unstretch
By Eliot Hochberg (eliot@high-mountain.com), September 26, 2002
Feedback Farm
Have something to say about this article? Let us know below and your post might be the Post of the Month! Please read our Official Rules and Sponsor List.
Forums
Want to dig even deeper? Post to the new MacEdition Forums!
The last article covered what anamorphic 16:9 is and why filmmakers would use it. This time we’re going to go over how to prepare a DVD to show anamorphic 16:9.
When capturing your video in Final Cut Pro, you’ll want to do it just as you normally would for regular 4:3 footage. This is because the footage is still 4:3. Some cameras do have a 16:9 aspect ratio. When capturing that footage, you would use the 16:9 setting. It’s worth noting that you should always capture lengthy footage using the capture clip mode, as opposed to the capture now mode. I have found that capture now can result in a greater likelihood of dropped frames for clips longer than a couple of minutes.
Fortunately for me, the footage from “The Bad Father” (mentioned in the previous article) was already color corrected. Since I was capturing from MiniDV, it appeared that the color correction stayed, so it wasn’t necessary for me to recorrect it. For most films that have already been edited, it’s likely that this will be the case.
Once the footage was digitized, it was time to get it ready for use in the DVD. I had done a little research, and figured (it turns out correctly) that I knew how to get the anamorphic footage ready properly. The key to doing anamorphic 16:9 footage on a DVD is in the MPEG2 encoding. My current method is as follows: I use the raw Final Cut Pro capture file as my source. I do this because I had a problem with stereo audio when exporting MPEG 2 from Final Cut Pro 3. For some reason that I can’t yet explain, Final Cut Pro 3 exported the stereo audio to a mono track split into stereo. I’m told that the stereo tracks were created with a Dolby system, but I don’t know if that’s the reason. I imagine if I wanted to use the special Final Cut Pro 3 features for chapters and encoding that I could export the video with FCP and then use the raw file just for audio. But for now, it’s more convenient to just use the raw file for both.
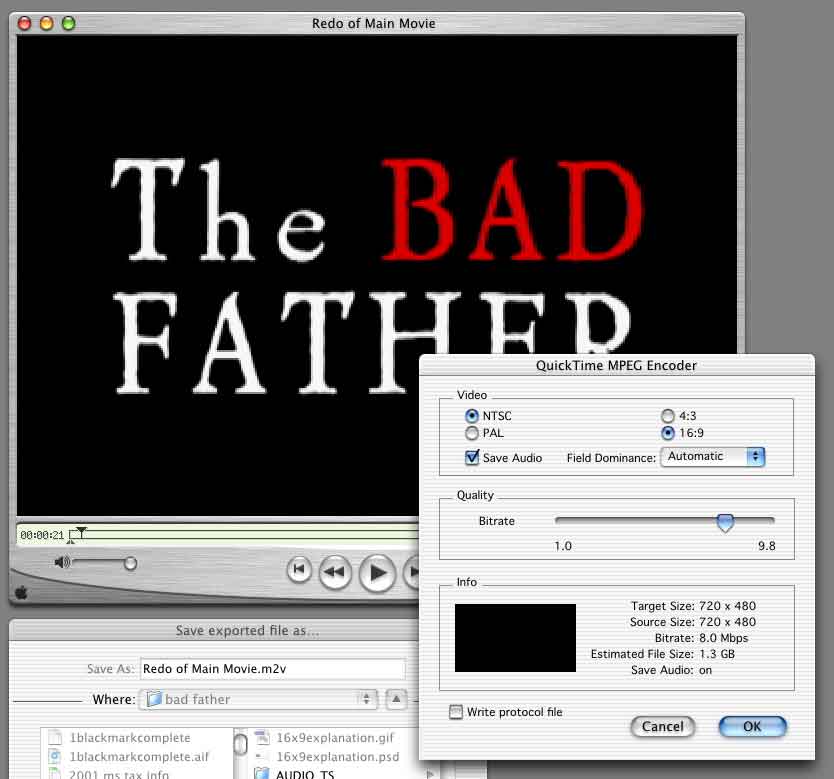
I then load that file into QuickTime Pro. From there, I export to MPEG2 (QuickTime Pro users don’t get excited, this is a feature specific to DVD Studio Pro only). In the options menu, there is a checkbox for “16:9.” I simply select that, and the encoder puts a marker on the footage that will eventually let the DVD player know it’s 16:9 footage. (See the accompanying screenshot.)
By the way, I use this method because of problems encoding from Final Cut Pro 2 that I had in the past. These problems may be solved in DVD Studio Pro 1.5 and Final Cut Pro 3 (both of which I’m using). However, I knew from experience this method would work, so that’s why I selected it. Also, I want to reiterate something from a previous column regarding encoding bit rate. When encoding your video, it may be tempting if you have a short film or other short content to encode at the highest setting. However, this is not a good idea. If you have audio along with your footage, you need to leave some bandwidth for the DVD player to be able to play both the audio and the video. This is especially true if you aren’t using A.Pack for your audio encoding.
The default audio that comes out of QuickTime is perfectly fine for a DVD, but it results in a much larger file than A.Pack can produce; and thus takes more of your bit rate bandwidth, around three times as much. Menus factor into the equation as well. My understanding is that if, for example, you had video with no audio, you would therefore think you could use the highest bit rate available. However, there appears to be a processing overlap when leaving a menu to go to your movie or vice-versa. So even if you are only doing video, I recommend never going above a bit rate of 9.6 to allow for DVD player performance differences and menu management. This probably also holds true for when you are using the new feature in Final Cut Pro 3 that allows you to designate different bit rates for different footage.
So it turns out that in the DVD I was creating, I wanted to use 4:3 menus with the 16:9 footage. This is totally possible, and in the next article I’ll go over how to do this and also how to get a cleaner transition than what’s found even in some “professional” DVDs.
The New Hollywood Workshop is dedicated to using Macintosh computers and software to do what the big boys do. Want an example? Check out Duality, a short made completely with Macintosh products.