
Digital photography and the macro universe
Phil Williams (http://www.photosolve.com), June 21, 2001
While only a very small number of us have enough money to buy a ticket into space, I’d venture a guess that given the chance, most of us would want to go. Hollywood has figured this out and regularly provide us with fantasy-serving solutions.
When I look up on a cloudless night and see the billions of tiny lights, I wonder what it would be like to travel in space, and see things first hand ... so I do the next best thing: I drag out the telescope and start scanning the heavens. It’s been that way with me for about three decades. You get a whole new perspective of our universe, even with the relatively limited view that we’re afforded from Earth. While the view is spectacular, it is, unfortunately, very fleeting, disappearing at first light. In order to capture some reminder of what you’ve experienced, you have to turn to the camera.
Film and the telescope
 I used to connect my 35mm film
camera and take pictures through the telescope. This was a fairly
“simple” procedure, using a number of different adapters,
T-mounts and connectors. A minimum amount of mechanical ability was
required. In general, you’d simply remove the lens of the camera,
screw on a T-mount designed to connect to your camera and connect directly
to the telescope. Essentially the telescope becomes a huge telephoto lens.
Your only challenge was to find something interesting to focus on and keep
it tightly centered in your viewfinder by tracking it manually
(“guiding,” requiring yet another attachment) or by using a
motor drive system to keep the planet or star in alignment with the
telescope.
I used to connect my 35mm film
camera and take pictures through the telescope. This was a fairly
“simple” procedure, using a number of different adapters,
T-mounts and connectors. A minimum amount of mechanical ability was
required. In general, you’d simply remove the lens of the camera,
screw on a T-mount designed to connect to your camera and connect directly
to the telescope. Essentially the telescope becomes a huge telephoto lens.
Your only challenge was to find something interesting to focus on and keep
it tightly centered in your viewfinder by tracking it manually
(“guiding,” requiring yet another attachment) or by using a
motor drive system to keep the planet or star in alignment with the
telescope.
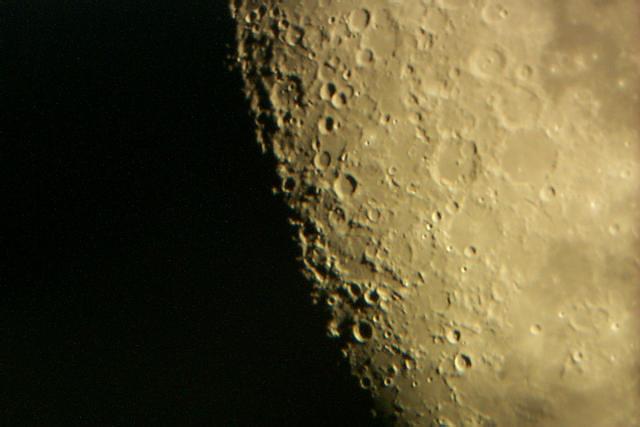
The Moon and some of the closer planets hold a certain fascination for me, and are often at the center of my celestial photographic efforts. What I discovered very quickly is that they present some very challenging subject matter. Most of my initial results were inconsistent, as exposure times are significantly longer than regular daylight exposures, ranging from minutes to hours of shots of the planets and other objects in deeper space. The Moon presents its own unique challenges as the reflected light coming from the Moon’s surface is much greater than normal daylight shots, requiring the use of a significant amount of neutral filtration to reduce the light to a useable level.
There are certainly challenges with film-based astrophotography, not the least of which are the extremely long time exposures required for deep-space photography (those little dots of light are very faint). In many cases, these long time exposures push against the physical limits of the film itself, and serious astrophotographers “pre-treat” the high-speed film to allow its usage for even longer periods of time. Again, as with most film-based photography, you have to wait until the processing lab returns the prints in order to determine that only one picture in twenty actually turned out okay. This has been very disappointing.
CCD imaging and the telescope
Technology in the form of a CCD (charge coupled device) camera was introduced a number of years ago (1970, to be exact), long before consumer digital cameras were readily available. The CCD camera represented a major breakthrough in photography as they are far more sensitive than film, and can render in 30 seconds what typically takes 30 minutes with film. Serious astrophotography requires the use of a CCD camera. A more detailed description of the CCD camera can be found at http://www.ghg.net/akelly/ccdbasic.htm.
The CCD camera is generally more expensive than a consumer digital camera if you look at dollars per pixel of resolution. Why? In simple terms, the CCD itself is susceptible to time-based noise build-up. To minimize this noise, you need to cool down the CCD itself. The CCD camera usually has a built-in cooling system, capable of lowering the temperature of the device to a point where long time exposures are acceptable. This cooling system raises the price significantly. Average-priced CCD cameras can run from $500 to $1400, and higher-end systems can range much higher. In general operation, the CCD camera would be hooked directly to a computer, and the photographs would be captured directly through a software application. Some very exciting photos can be captured through this solution, although the learning curve and usage can be somewhat challenging to the new user. A sample collection of CCD-generated images can be seen at http://www.wvi.com/~rberry/gallery.htm.
When the digital camera appeared in the consumer market a few years back, a new world opened up, making it much easier (for the most part) for many more people to participate in the world of astrophotography. The big difference between a consumer digital camera and a CCD camera is that a consumer digital camera does not have a cooling mechanism built in, and therefore the upper limit on time exposures is severely limited (typically 8-16 seconds, with some higher-end cameras capable of a minute or so). Again, this is due to the noise generated in the CCD during the exposure to light.
“Afocal” photography
So how do you hook up your digital camera to a telescope? The answer lies in a photographic method called afocal photography. Remember that the 35mm camera was generally used with the telescope with its normal lens removed. Because most digital cameras today are supplied with a lens that is not removable, you have to use the viewing lens of the telescope in this new method. Just set up your telescope and focus on a subject (this is easier to accomplish if you pick a stationary, earth-based subject) and then point the camera lens into the viewing lens of the telescope. Depending on the type of digital camera you have, you’ll probably have to turn on the LCD viewing screen to see the image. It’s important that the camera lens be as close as possible to the viewing lens of the telescope. You may see a tunnel around the image (called “vignetting”) that will go away if you adjust the zoom control on the camera.
Note that it’s somewhat difficult to hold the camera and maintain the image, so you’ll want to place the camera on a tripod, and adjust the camera until you get the best image. This is the simplest form of afocal photography.
Consider for a moment that the Earth is spinning; if you set up your telescope and focus on the Moon, you’ll find that within a short period of time the Moon will be out of view. If you “guide” the telescope either using the manual controls or motor-driven systems, the Moon will stay in view. If you’re relying on the tripod-mounted camera, then you’ve got a problem: the telescope has moved but the camera has remained fixed. What’s the solution? Attach the camera to the telescope.
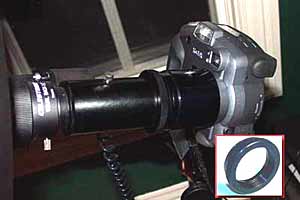
Attaching the digital camera to the telescope 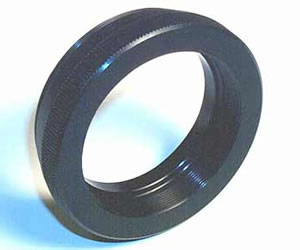
In order to accomplish this task successfully, you’ll need a couple of things: a camera with threads on the front, or an adapter that provides the threads (generally available either through the camera manufacturer or as an aftermarket device), and an adapter that takes you from those threads to the telescope (and keep in mind that you’ll need to have the viewing lens of the telescope included in the path as well).
Ensure that the connection to your digital camera is secure, as you’d be very unhappy if it went tumbling to the ground in the midst of all this activity. The camera can be securely attached through the use of a specially-designed T-mount adapter (available as an aftermarket device) and combination adapter, generally available from your telescope manufacturer.
I’d recommend a search of the Web for reading material: Use the words astrophotography, CCD and astronomy as beginning keywords in your search and you’ll find a host of reading materials. The rest is experimentation. With a digital camera, your exposure times will be somewhat limited, but you should be able to take outstanding pictures of the Moon and planets. You’ll probably find your shots of the Moon are overexposed unless you purchase and use a Moon filter (essentially a 70-90% neutral density filter). When you’ve taken a few successful shots you’ll be impressed, and you’ll have opened yet another door in the world of digital photography.