
Converting negative film to digital pictures
By Phil Williams (www.photosolve.com), June 26, 2003
Feedback Farm
Have something to say about this article? Let us know below and your post might be the Post of the Month! Please read our Official Rules and Sponsor List.
Forums
Want to dig even deeper? Post to the new MacEdition Forums!
Level: Beginner
Do you have 35mm negatives that you want to use digitally? If you have a digital camera, image-editing software and photosolve’s Xtend-a-Slide Plus, this can be done fairly easily. The techniques described here can also be applied to any digital image you have of a negative, so let’s dive right in.
Getting the negative image in the first place
If you have color or black-and-white 35mm film negatives that you’d like to convert to digital pictures, you’ve got a few choices:
- Take them to the local photo store and have them do it (generally expensive)
- Buy or borrow a good quality film scanner and do the job yourself (even with the cost reductions in negative scanners, this can be expensive, both in money and in time)
- Use your digital camera, some close-up lenses, an Xtend-a-Slide Plus and Photoshop (or equivalent)
Don’t kid yourself, though. The image you get from an expensive drum or film scanner will typically be much better (higher resolution, better quality) than what you should expect from your digital camera. But most users don’t require that level of quality. For 4x6 to 8x10 prints, or for Web viewing, your digital camera can do a very credible job. (If you want to know more about Xtend-a-Slide Plus, the PDF user guide is available online.)
The tools
Converting a 35mm negative to a usable digital photo is certainly a bit more complicated than simply shooting a 35mm slide, but once you understand the process, it moves fairly rapidly. When you add the film carrier to the Xtend-a-Slide Plus, you get a convenient way to frame whatever segment of the filmstrip you’re trying to capture.
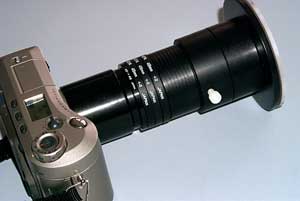 The Xtend-a-Slide System with close-up lenses, and lens adapter. Attached to a Kodak 4800. |
The Xtend-a-Slide Film Carrier |
Getting digital with it
Compare these two images:
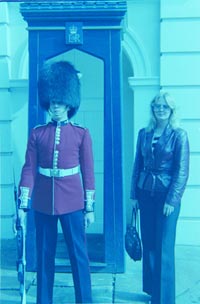
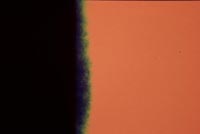
 The 35mm negative |
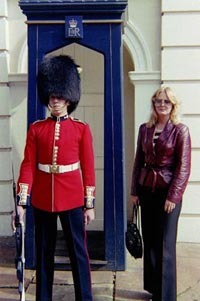
The final picture |
The first picture shows the original 35mm negative. The second image shows the final picture. To make the first into the second, there are basically two different approaches we can use:
Method 1: Shoot the negative and use commercial software to convert the negative to a positive.
This approach is pretty straightforward and uses a highly recommended, commercially available program called VueScan from Hamrick Software (www.hamrick.com). Ed Hamrick was kind enough to broaden VueScan’s capability to include the ability to “scan” JPEG files as well as the standard TIFF. Once you’ve shot the JPEG of your negative, you can simply use the software to convert the negative to a positive image. You can even set up a batch of negatives to convert and go get some coffee. You should definitely check this out as it does make life pretty simple. But it may not be a perfect solution for everyone. The correction curves built into the software may NOT include your particular film, so you might end up having to do some correction work anyway.
Method 2: More manual, more control (and more variation in method, too)
This method is the result of extensive experimentation, reading and web searching for other people’s ideas. Your results will vary depending upon light, camera, your personal color correction tastes, etc., but should allow you much more flexibility in deciding what is considered “correct” in the final image.
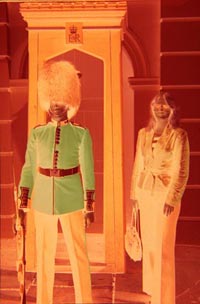
If you simply take a picture of the negative film and then invert the image in Photoshop, you’ll end up with a serious blue cast on your resulting image.
A simple invert of the negative |
Not pretty, and certainly not what we want. Its presence is expected, though. Notice the orange cast in the negative. This color is actually a special mask that is part of the film. If you remember that the inverse of orange is blue, you may slap your forehead and exclaim, “Of course!”
Why is the orange mask there? That’s a topic for a different discussion (or the homework for tomorrow is ...). Suffice to say that virtually all color negative films have it, and it continues to be a part of the regular printing/enlargement process because the dyes used are not always pure.
We need to get rid of the orange. To do that, we’re going to essentially erase it by adjusting the color curves associated with the picture. First, take a picture of the “clear” film leader (which is generally returned with your 35mm film). Note that there’s generally a piece that has some clear orange and black.
Film leader sample |

Fully blurred orange |

... and black samples |
Using your digital camera and Xtend-a-Slide Plus set-up, take a digital picture of the film leader as shown (with some orange and some black) and then in Photoshop or other editor, copy and paste a rectangle of the orange into a new file. Do the same with the black. The size of your sample doesn’t really matter. Using a Gaussian blur, heavily blur the content of these new files. This helps even out the colors to ensure the sample you get is what you want.
With the picture of your negative visible in Photoshop, and the two pictures of the black and orange samples visible, select Adjust Curves. You’ll be presented with the dialog shown below. Here’s where all the preparation pays off ...
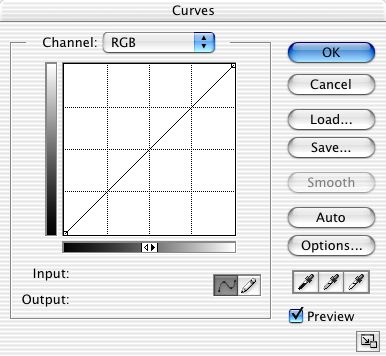
Adjusting curves in Photoshop |
Click on the small eye dropper on the right (with the white in it). This will set the white point in your negative. Move the cursor until it is over the blurred orange sample, and click on the screen. You should immediately notice a fairly signficant change in your picture of the negative.

White Point adjustment |
Click on the eye dropper with the black color. Similarly, move the cursor until it is over the black sample on your screen, and click. This will set the black point. You may notice a small change in the picture.

Black Point adjustment |
Your negative should now end up looking like the picture below. Notice how much of the orange cast has been removed. By setting the white and black points to our orange and black samples, we’ve told Photoshop that the orange color is really what should be clear or white, and the black color is our darkest spot on the negative. We may end up doing a bit of adjustment to overall levels, but this’ll get us most of the way there.
Corrected negative |
Finally, invert the corrected negative by selecting the Invert selection (Image: Adjust). If your inversion results in a picture with not-quite-right color levels, simply try using Image: Adjust: Auto Levels.
|
The final picture |
Lather, rinse, repeat if you’re not quite happy with the results, or if you have several images to convert. The final image should now be ready to send on its merry way to a printer, web page, or whatever purpose you have for it.
A brief recap of the steps:
- Shoot a picture of the color negative
- Shoot a picture of the film leader. Do this by setting the film leader up so that you get a bit of black and a bit of orange on the same shot or, if necessary, you can actually shoot two pictures.
- Create two separate files, one with the orange and one with the black; apply a heavy Gaussian blur to each file.
- With the color negative selected, select Adjust: Curves, then individually set the white balance from the orange and black level from the black
- Select the corrected color negative, and select Adjust: Invert
- Do any sharpening or final adjustments that you feel necessary
Phil Williams (phil@photosolve.com) has been a photographer for longer than he (or anyone else) can remember and has been designing, manufacturing and shipping unique, award-winning digital accessory solutions at www.photosolve.com for over 4 years. If you’ve got an idea that solves a problem or creates a new application or you’d just like to get some question resolved, send Phil an email and he’ll try to help you.